

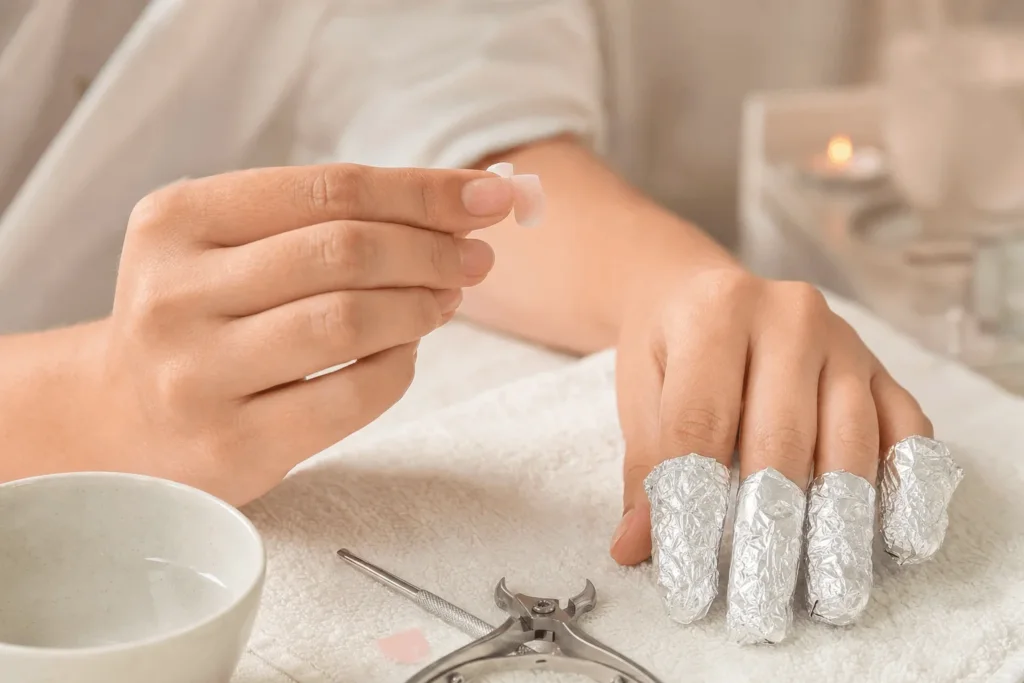
Removing acrylic nails at home requires the right technique and patience to protect your natural nails from damage. Whether you want to save money, avoid a salon visit, or simply prefer the convenience of DIY removal, you can safely take off your acrylic nails using acetone-based methods. This complete guide walks you through every step of how to remove acrylic nails at home, from gathering supplies to post-removal nail care.
We will cover the acetone soak method, alternative removal options, common mistakes that cause damage, and when professional help is worth considering. You will also learn specific product recommendations available in Canadian drugstores and how to restore your natural nails after removal.
Quick Answer
To remove acrylic nails at home safely, file down the top layer, soak cotton balls in pure acetone, wrap each nail in aluminum foil for 20-30 minutes, then gently push off the softened acrylic with an orange wood stick. Finish with cuticle oil and moisturizer.
What You Need: Complete Supply List for Safe Acrylic Nail Removal
Gathering the right supplies before you start prevents damage and makes the removal process much smoother. Using pure acetone instead of regular nail polish remover cuts your soaking time in half and dissolves acrylic more effectively.
Here is everything you need for safe acrylic nail removal at home:
- Pure acetone (100% acetone, not acetone-free polish remover)
- Coarse nail file or buffer (180-grit or lower)
- Nail clippers or heavy-duty scissors
- Cotton balls or cotton pads
- Aluminum foil (cut into 10 squares, about 3×3 inches each)
- Orange wood stick or metal cuticle pusher
- Cuticle oil or vitamin E oil
- Rich hand cream or moisturizer
- Nail strengthener or base coat
- Small bowl for acetone (glass or ceramic, never plastic)
At Arezoo Beaute, our nail technician Nasrin often reminds clients that investing in quality supplies makes a significant difference. You can find these supplies at major Montreal drugstores. For pure acetone, look for Onyx Professional 100% Acetone at Sally Beauty Supply locations (around $7), or check Shoppers Drug Mart and Jean Coutu for their store-brand pure acetone options ($6-8). For nail files, Revlon and Tweezerman brands available at Pharmaprix provide professional-quality results.
One additional tip: work in a well-ventilated area. Acetone fumes can be strong, so open a window or turn on a fan before you begin the removal process.
Key Takeaways
- Use pure acetone and aluminum foil wraps for fastest removal
- File down the top acrylic layer before soaking to speed process
- Never force or peel acrylic off your natural nails
- Expect 30-40 minutes total for complete safe removal at home
- Moisturize immediately after removal and daily for one week
Step-by-Step Guide: How to Remove Acrylic Nails at Home Safely
Following the correct order and timing prevents the most common removal mistakes. Rushing through steps or skipping the filing stage adds unnecessary stress to your natural nails and can cause peeling or splitting.
Filing Down the Acrylic Layer and Preparing Nails
Start by trimming your acrylic nails as short as possible using nail clippers. This reduces the amount of acrylic you need to dissolve and makes the soaking process more efficient.
Next, use a coarse nail file to remove the shiny top coat layer. File the entire surface of each nail until you see the acrylic turn dull and matte. You are not trying to file down to your natural nail, just breaking through the sealed top layer so acetone can penetrate.
This filing step reduces your soaking time by 10-15 minutes. Many clients skip this part and then wonder why their nails take 45 minutes to soften. Breaking that top seal makes all the difference.
Wash your hands with soap and dry them completely before moving to the acetone soak. Any moisture or oils on your nails will dilute the acetone and slow down the removal process.
The Acetone Foil Wrap Method (With Timing Guidelines)
Pour pure acetone into your glass bowl. Soak one cotton ball in acetone, squeeze out the excess, and place it directly on top of your nail, covering the entire acrylic surface.
Wrap a square of aluminum foil around your fingertip, securing the cotton ball tightly against your nail. The foil prevents evaporation and keeps the acetone in constant contact with the acrylic. Repeat this process for all ten nails.
Set a timer for 20 minutes. This is the minimum soaking time for most acrylic applications. Thicker acrylics or builder gel overlays may need 25-30 minutes.
After 20 minutes, remove the foil wrap from one nail and gently push the acrylic with an orange wood stick. If it slides off easily, proceed with the other nails. If it resists, rewrap that nail and wait another 5-10 minutes.
Never force the acrylic off. If it does not move easily with gentle pressure, it needs more soaking time. Forcing it damages the top layers of your natural nail and causes weakness.
Once all acrylic is removed, gently buff your natural nails with a fine-grit buffer to smooth any remaining residue. Wash your hands thoroughly to remove all acetone traces, then apply cuticle oil generously to each nail and surrounding skin.
At our Montreal studio, we notice clients who soak their hands in warm water for 3-5 minutes before starting acetone removal experience less cuticle dryness. The pre-soak hydrates your skin so acetone causes less irritation during the removal process.
Alternative Removal Methods Without Acetone
If you prefer to avoid acetone due to sensitive skin or strong odor concerns, you have a few alternative options. These methods take longer and require more patience, but they can work for certain nail types.
The dental floss method involves sliding floss under a lifted corner of the acrylic nail and gently sawing back and forth. This only works if your acrylic has already started lifting naturally from your nail bed. Forcing floss under adhered acrylic causes severe damage to your natural nail surface.
Warm water soaking fills a bowl with warm water and a few drops of dish soap, then soak your nails for 30-40 minutes. The acrylic will not dissolve, but it may soften enough to gently pry off with a cuticle pusher. This method works best on older acrylic sets that are already starting to separate.
Acetone-free nail polish remover contains alternative solvents that can slowly break down acrylic, but expect to soak for 60-90 minutes instead of 20-30. In our experience at Arezoo Beaute, pure acetone remains the most effective and least damaging option when used correctly.
Ready to enhance your natural beauty?
Book your consultation today and let our expert team help you choose the perfect treatment for your goals.
Common Mistakes That Damage Your Natural Nails During Removal
Understanding what not to do prevents most acrylic removal damage. These mistakes cause the splitting, peeling, and weakness that give DIY removal a bad reputation.
Peeling or pulling acrylic off without proper soaking is the number one cause of nail damage. When you force acrylic off, it takes layers of your natural nail with it. This leaves your nails paper-thin and prone to breaking for weeks afterward.
Using regular nail polish remover instead of pure acetone extends your soaking time significantly. Many people get impatient after 30 minutes and start forcing the acrylic, which leads back to the first mistake.
Skipping the filing step means acetone cannot penetrate the sealed top coat efficiently. You end up soaking for 45-60 minutes when 20-25 would have been enough with proper preparation.
Over-filing after removal damages already-stressed nails. Once the acrylic is off, your natural nails need gentle treatment. Aggressive buffing or filing removes too much of the nail plate and creates weak spots.
Forgetting to moisturize immediately after removal allows acetone dryness to set in. Your nails and cuticles are extremely dehydrated after soaking, and waiting even an hour to apply oil makes recovery slower.
Post-Removal Nail Care: Repair and Strengthen Your Nails
Your natural nails need intensive care after acrylic removal to restore moisture, strength, and flexibility. Proper aftercare prevents breakage during the recovery period and prepares your nails for future enhancement or healthy growth.
Immediate Moisturizing and Cuticle Care
Apply cuticle oil to each nail and surrounding skin immediately after removal. Massage the oil into your nail beds and cuticles for 30-60 seconds per hand. This replenishes moisture that acetone stripped away and prevents the tight, cracked feeling around your nails.
Follow with a rich hand cream, focusing on your nail beds and the skin under your free edge. Reapply cuticle oil and hand cream at least three times daily for the first week after removal.
For cuticle oil, CND Solar Oil (available at professional beauty supply stores for $10-15) remains one of the most effective treatments. For hand cream, Eucerin Advanced Repair Hand Cream provides intensive moisture without greasy residue and is available at Jean Coutu and Pharmaprix for around $12.
Apply a nail strengthener starting 24 hours after removal. Revlon Extra Life Nail Strengthener (available at Shoppers Drug Mart for approximately $8) contains protein formulas that help rebuild nail structure. Reapply every 2-3 days as the previous coat wears off.
Recommended Timeline for Nail Recovery Between Acrylic Sets
Your nails need at least 2-3 weeks of recovery time before applying another acrylic set. This allows your nail plate to rebuild thickness and regain its natural moisture balance.
For clients who wore acrylics continuously for 6 months or longer, we recommend a 4-6 week break. Extended acrylic wear compresses the nail plate and disrupts its natural growth pattern. The longer break gives your nails time to normalize.
During your recovery period, keep your nails trimmed short. Longer nails are more prone to breakage when they are thin and weakened from acrylic removal. Avoid gel manicures during the recovery period as gel polish requires buffing that removes additional nail plate layers.
| Recovery Timeline | Nail Care Action | What to Avoid |
|---|---|---|
| Days 1-7 | Apply cuticle oil 3x daily, use nail strengthener every 2-3 days | Water exposure longer than 10 minutes, harsh chemicals |
| Weeks 2-3 | Continue oil 2x daily, gentle buffing if needed, maintain short length | Gel manicures, aggressive filing, using nails as tools |
| Weeks 4-6 | Reduce to oil 1x daily, assess nail strength before new enhancements | Rushing back to acrylics before nails feel strong and flexible |
| Weeks 6+ | Resume normal nail care routine, safe to apply new acrylic set | Skipping strengthening treatments before re-application |
Product Recommendations Available in Canadian Drugstores and Beauty Stores
Choosing the right products makes acrylic removal safer and more effective. These specific items are readily available throughout Montreal and perform well based on professional standards.
For pure acetone, Onyx Professional 100% Acetone works efficiently and costs around $7 at Sally Beauty Supply locations across Montreal. Avoid products labeled acetone nail polish remover as these contain only 30-60% acetone mixed with other ingredients.
Revlon Extra Life Nail Strengthener is available at Shoppers Drug Mart for approximately $8 and contains protein formulas that help rebuild nail structure. Apply this as a base coat during your recovery period.
CND Solar Oil remains one of the most effective cuticle treatments available in Canada. You can find it at professional beauty supply stores for $10-15. A small bottle lasts 3-4 months with daily use. Alternative options include OPI ProSpa Nail & Cuticle Oil (available at Jean Coutu for $12-14) or Sally Hansen Vitamin E Nail & Cuticle Oil (Pharmaprix, $6-8).
For hand cream, Eucerin Advanced Repair Hand Cream provides intensive moisture without greasy residue. Available at Jean Coutu and Pharmaprix for around $12, this formula absorbs quickly and works well for post-acetone dryness. Neutrogena Norwegian Formula Hand Cream (Shoppers Drug Mart, $8-10) offers similar benefits.
Tweezerman Pushy and Nail Cleaner gives you professional-quality tools for safe acrylic removal. The beveled edges prevent gouging your nail plate while effectively removing softened acrylic. Available at Sephora for approximately $18.
For nail files, Revlon Compact Emery Boards (Jean Coutu, $4-5) or TweezermanFilemate (Shoppers Drug Mart, $10-12) provide the coarse grit needed for effective acrylic removal without damaging your natural nails.
Knowing how long nail extensions typically last helps you plan removal timing and maintain healthy nail cycles between enhancement applications.
Cost Comparison: DIY Removal vs Professional Salon Services in Montreal
Understanding the true cost of DIY removal versus professional service helps you make an informed decision based on your budget, time, and comfort level with the process.
DIY acrylic nail removal costs approximately $15-25 for all supplies in Montreal. A bottle of pure acetone runs $6-8 at Shoppers Drug Mart or Jean Coutu, nail files cost $3-5, aluminum foil is $2-3, cotton balls are $3-4, and cuticle oil ranges from $6-15 depending on brand. These supplies last for multiple removals, so your actual per-removal cost drops to around $5-7 after the initial investment.
Professional acrylic removal at Montreal salons typically costs $20-35 as a standalone service. At Arezoo Beaute, acrylic removal is priced at $25 and includes proper nail conditioning, cuticle care, and professional assessment of nail health. Some salons offer free removal if you are getting a new set applied immediately. This service usually takes 30-45 minutes.
The time investment differs in convenience rather than duration. DIY removal takes 40-60 minutes when you include prep, soaking, cleanup, and aftercare. Professional removal takes about the same time but requires travel to and from the salon, adding 20-40 minutes depending on your location in Montreal.
Consider the risk factor as well. Improper DIY removal can damage your nails, requiring additional spending on repair treatments or professional correction. First-time removal attempts carry higher risk of mistakes. If you have never removed acrylics before, the $20-35 professional service might save you from costly damage that takes weeks to repair.
For regular acrylic wearers, learning proper DIY removal saves approximately $200-300 annually if you remove and reapply sets every 3-4 weeks. The initial supply investment pays for itself after just 2-3 removal cycles.
At Arezoo Beaute, we see clients make both choices depending on their situation. Regular nail clients often learn DIY removal and alternate with professional services. First-timers typically prefer professional removal to see the correct technique before trying it at home.
You can explore nail care services to understand what professional removal includes and compare that to your DIY comfort level.
When to See a Professional Instead of Removing Acrylic Nails Yourself
Certain situations make professional removal the safer and smarter choice. Recognizing these scenarios prevents nail damage and potential health complications.
If your acrylic nails show signs of lifting with visible gaps between the acrylic and your natural nail, see a professional immediately. These gaps trap moisture and bacteria, creating infection risk. Professional removal includes sanitization steps that DIY methods often miss.
Visible green or yellow discoloration under your acrylics indicates bacterial or fungal growth. Do not attempt home removal in this situation. You need professional assessment and proper nail treatment to prevent the infection from spreading or worsening. Medical consultation may be necessary.
First-time acrylic wearers benefit from watching professional removal at least once. Seeing the correct pressure, timing, and technique helps you avoid common mistakes when you eventually try DIY removal. Many Montreal salons allow you to observe the process and ask questions.
If you experience pain, unusual sensitivity, or nail bed tenderness before removal, professional assessment is important. These symptoms might indicate allergic reaction, nail bed separation, or other issues that need expert evaluation.
Very thick builder gel or hard gel overlays require professional removal equipment. These products do not dissolve in acetone like traditional acrylic and need careful filing with electric tools to avoid nail damage. Attempting DIY removal on hard gel wastes time and risks injury.
Clients with thin, damaged, or naturally weak nails should choose professional removal. Experienced technicians adjust their technique based on nail condition, providing gentler removal that minimizes stress on already-compromised nails.
If you feel uncertain, anxious, or lack confidence about DIY removal, that uncertainty often leads to mistakes. Professional service provides peace of mind and guarantees safe results.
Montreal beauty salons with experienced nail technicians can safely handle these situations. Reputable studios use proper sterilization, quality products, and gentle techniques that protect your natural nails during removal.
Understanding the difference between gel and acrylic extensions helps you determine whether your specific nail type requires professional removal or works well with DIY methods.
Frequently Asked Questions
How long does it take to remove acrylic nails at home?
Complete acrylic nail removal at home typically takes 40-60 minutes total. This includes 10 minutes for filing and prep, 20-30 minutes for the acetone soak, and 10-15 minutes for gently removing the softened acrylic and cleaning up. Thicker acrylics may require an additional 10-15 minutes of soaking time.
Can you remove acrylic nails without acetone?
Yes, you can remove acrylic nails without acetone using methods like dental floss, warm water soaking, or acetone-free polish remover, but these alternatives take 60-90 minutes and work best only on older acrylic sets that are already lifting naturally. Acetone remains the most effective removal method when used properly with adequate ventilation.
What supplies do I need to remove acrylic nails at home?
Essential supplies include pure 100% acetone, a coarse nail file (180-grit or lower), nail clippers, cotton balls or pads, aluminum foil squares, an orange wood stick or cuticle pusher, cuticle oil, and rich hand moisturizer. All these items are available at Montreal drugstores like Shoppers Drug Mart or Jean Coutu, with total initial investment around $15-25.
Will removing acrylic nails at home damage my natural nails?
Removing acrylic nails at home does not damage your natural nails when you use proper technique, allow sufficient soaking time, and never force or peel the acrylic off. Damage occurs when people skip the filing step, use insufficient acetone, pull acrylics off before they fully soften, or over-buff afterward. Immediate moisturizing with cuticle oil and a 2-3 week recovery period keeps your nails healthy.
When should I go to a salon instead of removing acrylic nails myself?
Visit a professional salon for acrylic removal if you notice lifting with gaps that could harbor bacteria, any green or yellow discoloration indicating infection, pain or unusual sensitivity, or if you have very thick builder gel that does not dissolve in acetone. Montreal beauty salons charge $20-35 for safe professional removal that includes proper sanitization and nail conditioning.
Trust Your Nails to Expert Care in Montreal
Removing acrylic nails at home successfully requires patience, proper supplies, and attention to technique. The acetone soak method remains the safest and most effective approach when you file the top layer first, soak for adequate time, and never force the acrylic off your natural nails. Post-removal care with cuticle oil and moisturizer, combined with a 2-3 week recovery period, keeps your nails healthy and strong for future enhancements.
Whether you choose DIY removal or professional service, Arezoo Beaute brings 9+ years of beauty expertise to Montreal clients seeking quality care across all treatments. Our team understands the importance of nail health and proper technique in every beauty service we provide. Schedule your free consultation to discuss nail care, permanent makeup, or any of our specialized beauty services at our Rockland location.